Today I painted the remaining walls of the roundhouse and thought I'd add a blurb here to share my technique for painting plaster stone wall castings. Two days ago I started with sealing the unpainted castings with clear Acrylic from a rattle can. Either flat or satin will work just fine. I let them dry for two days but overnight would have been good. For color I'm using Acrylic paint (DecoArt Americana).
In a 4" plastic lid I mix a quarter (25 cents) sized blob of paint with two siphon loads of water (5 ml each). For sponges I use natural uncut sponges about 3" in diameter. They should be soaked in water and then rung out until there are no drips.
I start with "Grey Sky". I dip the sponge in the paint and dab it on a paper towel until I no longer get a solid blotch. Then I lightly dab the sponge on the surface of the plaster casting, not covering the whole surface, and turning my hand side to side with each dab to prevent repetition.
The next color is "Mississippi Mud" and gets mixed with the same proportions but is mixed in with the previous color. Apply as above.
Next is "Burnt Umber". Mix as above, quarter sized blob with two siphons of water. Use a brush to apply to random stones and then randomly dab on with a sponge as before. In the picture below, the top row shows the random stones painted with a brush and the bottom row shows the final look after the sponge work.
"Burnt Sienna" is next, mixed the same as above. This has a reddish look. Apply this with a small brush, fully loaded so it floods the grout lines when you touch it to them. It'll get all over everything so neatness doesn't count here. Do a small area at a time, maybe 1/2 a wall casting. After painting the grout lines come back with a clean sponge and gently dab the stone surfaces until the grey starts to show through. Turn the sponge often to keep a clean side in use. The picture below shows the flooded grout lines on the lower left.
The next picture, below, shows the casting after the "Burnt Sienna" has been dabbed with the sponge. Now it's starting to look like something.
Now clean out the plastic lid and mix a solo batch of "Raw Sienna" (golden yellow), using one quarter sized blob to two siphons of water. Dab on gently, sparingly and randomly with a clean sponge, twisting your hand back and forth to prevent patterns.
The final step for painting is to mix India Ink. Pour out a quarter size puddle and mix in 2 siphons of water in a clean plastic lid. Rinse and squeeze out two sponges. One sponge is used to wipe the ink across the surface, working it into the grout lines. Follow immediately with a clean sponge, dabbing the surface of the stones. Keep turning the sponge to present a clean face. Work it gently until the color shows through the ink. The ink will lighten as it dries and you may want to go back over the casting again to darken it more.
The dark black on some areas of the casting are ink that hasn't dried yet. I had settled on the is look until I came up with the idea of doing the grout.
This is only the second time I've used painting technique and it's been over two years since the last time. I wrote everything down knowing I'd be coming back to it later. My big question was would it match? That was crucial for me since all the walls go to the same building.
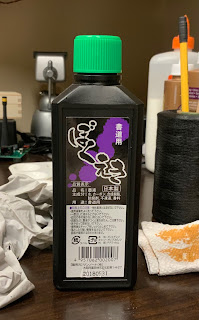
Note: When choosing an India Ink be aware that some are mixed with purple. I don't know why they would do that but I ruined 500 ties because of it. Verify that it's a true black ink. Here's what I use.
I have no idea what the label says but it is certified black India Ink. From Japan.
The next step is to fill the grout lines. I use DAP Wallboard Compound (mud) and still had a tub of it from two years ago. When I opened it up it looked like new. Good mojo!
Use two freshly rinsed sponges. One for applying the mud and the second for cleaning the surface a few minutes later. The sponges should be wet but not sopping wet. I rinse them and then squeeze once to get rid of most of the water.
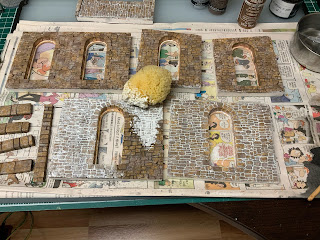
To apply the mud I load up one end of the sponge and dab it on the casting, working it into all the cracks and crevices. I can do an entire casting at a time and then come back with a clean sponge and gently wipe it diagonally across the surface to clean the face of the stones. Leave the mud in the grout lines. The point is to not scrub off the paint with the polish-like mud. I turn the sponge as I go to keep using a clean side. For the larger castings I might have to rinse out the sponge several times. After 15 to 30 minutes the wet stones will start to dry and look hazy. Go back again with a clean sponge and very gently wipe the surface again. Some of my castings took more than two cleanings. In the photo below the casting with the sponge is in the process of getting mudded (?). The casting to the right of it has been cleaned once and is still wet.
The photo below shows all the castings after several cleanings and having sat drying for about 40 minutes. The two at the bottom are identical castings having come from the same mold. The one with the windows set in place was done two years ago The one on the left will continue to fade a bit more with time as the water continues to dry out from the mud and the paint. After drying for several hours I was unable to tell them apart. I think the paint formula works pretty well.
There's still more cleanup to do here. After drying for 24 hours go back and clean the mud from areas where it has built up too much. The surface of the stone wall is not flat and some stones are sunk in deeper than others, tending to get covered up with mud. Use a paint brush with short stiff bristles to scrub off any mud that has dried on the stone. In the picture above on the bottom left wall casting you can see where mud has built up against the raised stones surrounding the windows.
The process here goes pretty fast. The mud is pretty forgiving too and you can go back and work it again with a wet sponge or brush after it's dried. You may also see areas during the process or after where the mud has been scrubbed out of the grout lines. You can go back and redo these areas with fear of ruining your other work.
The filled grout lines look pretty good to my eye. What I really like is the multi-colored stones. Those really capture the look of the real thing. I haven't tried weathering these walls yet and I plan to let them dry for a good long time. Sometime in the future I may try weathering on a scrap piece and if I find a good technique for that I'll write it up here.


