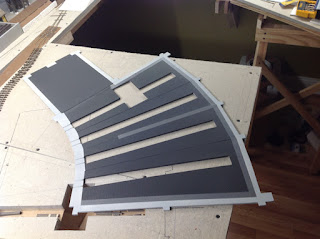
With the roundhouse space closed in I moved on to detailing the interior. I found a drawing of standard roundhouse designs for the Central Pacific RR and another of the roundhouse for the East Broad Top RR. These showed dimensions for inspection pits and a drop pit for removing the driver wheels from a locomotive. Cool! That would be a nice feature to add. The drop table uses a hydraulic lift placed under the locomotive. After the drive wheels are unbolted the table is lowered and rolled to the side on a pair of tracks where the wheels can be removed from the pit and taken to the shop for machining. The drop pit is just wide enough to take one or two pairs of drivers and the locomotive is still supported at each end by the other driver and maybe a pair of jacks under the cab.
I belong to a forum called FreeRails (Click here) and it was there that I was introduced to an inexpensive 3D printer (Ender 3, $200), the perfect thing for making my own parts. You design the parts on a CAD program (I use TinkerCAD) then transfer your design to a slicer program (Cura) that creates the commands for the 3D printer to make your part. It’s a lot easier than it sounds. The cool thing is that you can make parts that aren’t available commercially like the drop table. That was my first 3D project. I designed the drop table itself from photos and the hydraulic system for it from an old drawing I came across.
I made the inspection pits from MDF and added sugar cube speakers at the far end of the floor for pits #1 and #2. I disguised the speakers to look like floor drains using HO scale grating from Grandt Line. The speakers will add sound effects for the roundhouse interior that will be activated from a button mounted on the layout facia. The photos below show the inspection pits and parts used for the speakers and on the right is the CAD design for the sugar cube speaker baffle mounted below the pit floor.

It was about this time that my wife and I took a break and went to Savannah, Georgia for a long weekend. The idea was to tour the old city section but it just turned out that there's a railroad museum about three blocks from where we stayed. Hmmm. The museum includes the roundhouse and shops of the Georgia Central RR and provided many details that I’ve tried to incorporate into my model. These include ventilators in the skylights, wood block flooring, smoke jacks for the locomotive smoke stacks and interior lighting.
I made skylight ventilators from parts I got from Grandt Line before they went out of business. The smoke jacks were also a kit from Grandt Line but I modified the hoods to resemble the smoke jacks I saw in Savannah and printed those out on the 3D printer.
The wood block floor took some investigation. I found that industries used wood block flooring to prevent damage to machines parts that might be dropped. This flooring was also used in greasy, oily environments. The wood absorbs oil and prevents slippery conditions. Individual brick shaped blocks can be replaced as needed. I also found that it was common to seal the blocks with coal tar which makes the floor a dull black. I think they did this to make the blocks waterproof. I made my wood block flooring from HO scale brick plastic sheets that were intended for modeling roadways. Painted grey/black the bricks closely resemble the coal tar sealed wood blocks.
For the interior lighting I used Grandt Line O scale lamp reflectors with soft white LEDs. The LEDs came on a roll of 500 ($15) intended for lighting effects such as under cabinet lighting. They were in series/parallel with groups of 3 matched with a resistor to supply the correct voltage. I needed five rows of four and simply used a matching resistor for each row. Worked out just fine and the extra LED in each row lowered the voltage enough to slightly dim the light. Perfect. The picture below right shows the lamps installed on the inverted roundhouse frame and the power busses running beneath each truss.

I also used the printer to make workbenches and storage cabinets and shelves as well as junk to put on the shelves and tool boxes for the workbenches.
In my roundhouse research I came across a photo showing a system used in the early 1900’s for blowing out the boiler tubes in locomotives. Water running through the tubes is high in minerals and these collect on the inner surface and eventually clog the boiler tubes, creating a dangerous opportunity for explosion. To prevent this a regular service routine involved cooling down the boiler water, blowing it out and then replacing it with fresh water. Then the locomotive would be fired up and brought up to temperature. This was usually an overnight process and reduced the amount of time the locomotives could be in operation, which of course meant loss of income. This time was greatly reduced with the use of the Miller System, permanently installed in roundhouses and locomotive shops. The system involved plumbing used to removed the old hot water, run it through a filter and then return it to the locomotive still hot. I modeled it using brass rod for the piping and made the storage tanks, filters and pumps with the 3D printer. Below can be seen the original drawing of the system, the pump room and equipment added to the back of the roundhouse, the plumbing mounted to the support post of the trusses and finally, how the overhead plumbing was routed. In that last overhead shot you can also see the floor drain grating over the speaker in the closest inspection pit.


No comments:
Post a Comment